Dockerize your Next.js application on Spheron Compute
Streamline Deployment and Unlock the Potential of Containerization with Spheron Compute


Table of contents

🫂 Introduction
The use of containers has come to be an essential tool for successful application deployment and scalability in today's rapid development situation. Docker, a popular containerization platform, has transformed the way programs are packaged and delivered. Furthermore, Next.js, a powerful React framework for creating server-side rendered (SSR) and static websites, is increasing in popularity among developers. Using the advantages of Docker and Next.js brings up a world of possibilities for improved scalability and streamlined development methods.
In this blog post, I will share my experience of Dockerizing a Next.js application on Spheron Compute, a cutting-edge infrastructure platform, while working directly from my VS Code platform. Let's dive in and explore how this process can enhance the deployment process and leverage the full potential of containerization.
💡 Understanding Spheron: An Overview
Explore Spheron, a revolutionary technology that enables developers like us to create great decentralized applications (dApps) and apps on various blockchain platforms. It serves as a strong framework that facilitates development while boosting the scalability, security, and transparency of your applications. Spheron, by leveraging blockchain's decentralized nature, enables interactions without the requirement for trust between parties and assures that data remains unaltered, revolutionizing the way we develop and deliver applications. You can truly leverage the power of blockchain technology in your projects with Spheron.
📍 How to Deploy a Next App?
Deploying a Next.js app is a simple process that allows you to show up JavaScript applications to the rest of the world. To make the deployment process easier, I followed Spheron's detailed directions on how to deploy a Next.js project. I was able to shorten the deployment process and provide a smooth experience for my users by utilizing the rich features of Spheron Compute and working directly in my trusted VS Code editor.
Here are the clear steps I followed to deploy my Next.js app:
Prerequisites
You will need the following information in order to follow this guide successfully:
A DockerHub account.
Nodejs is installed on your local machine.
A text editor. I can use Visual Studio Code or your favorite text editor.
Note:- These prerequisite steps are followed by Spheron Docs Guide.
Step 1️⃣: Create a Next App
To begin deploying your Next.js app, you'll start by creating a new project. Open your trusted VS Code editor and navigate to the terminal. Execute the following command to create a new Next.js project:
npx create-next-app nextapp
This command initializes a new Next.js app named "nextapp" in your current directory. By using VS Code as your development platform, you can easily switch between coding and executing commands in the terminal, making the entire process seamless and efficient.
Once the command completes, you can proceed to the next steps to configure and deploy your Next.js app on Spheron Compute.

Navigate to the project directory using the command:
cd nextapp

Within the project, create a new file named hello.js inside the pages/api directory. Add the following code to the file:
export default function handler(req, res) {
  res.status(200).json({ message: "Hello, World!" });
}

To verify that the app is running correctly, start the development server by running:
npm run dev
Open your web browser and visit localhost:3000/api/hello. You should see the JSON response {"message": "Hello, World!"} displayed.

Step 2️⃣: Create a Dockerfile
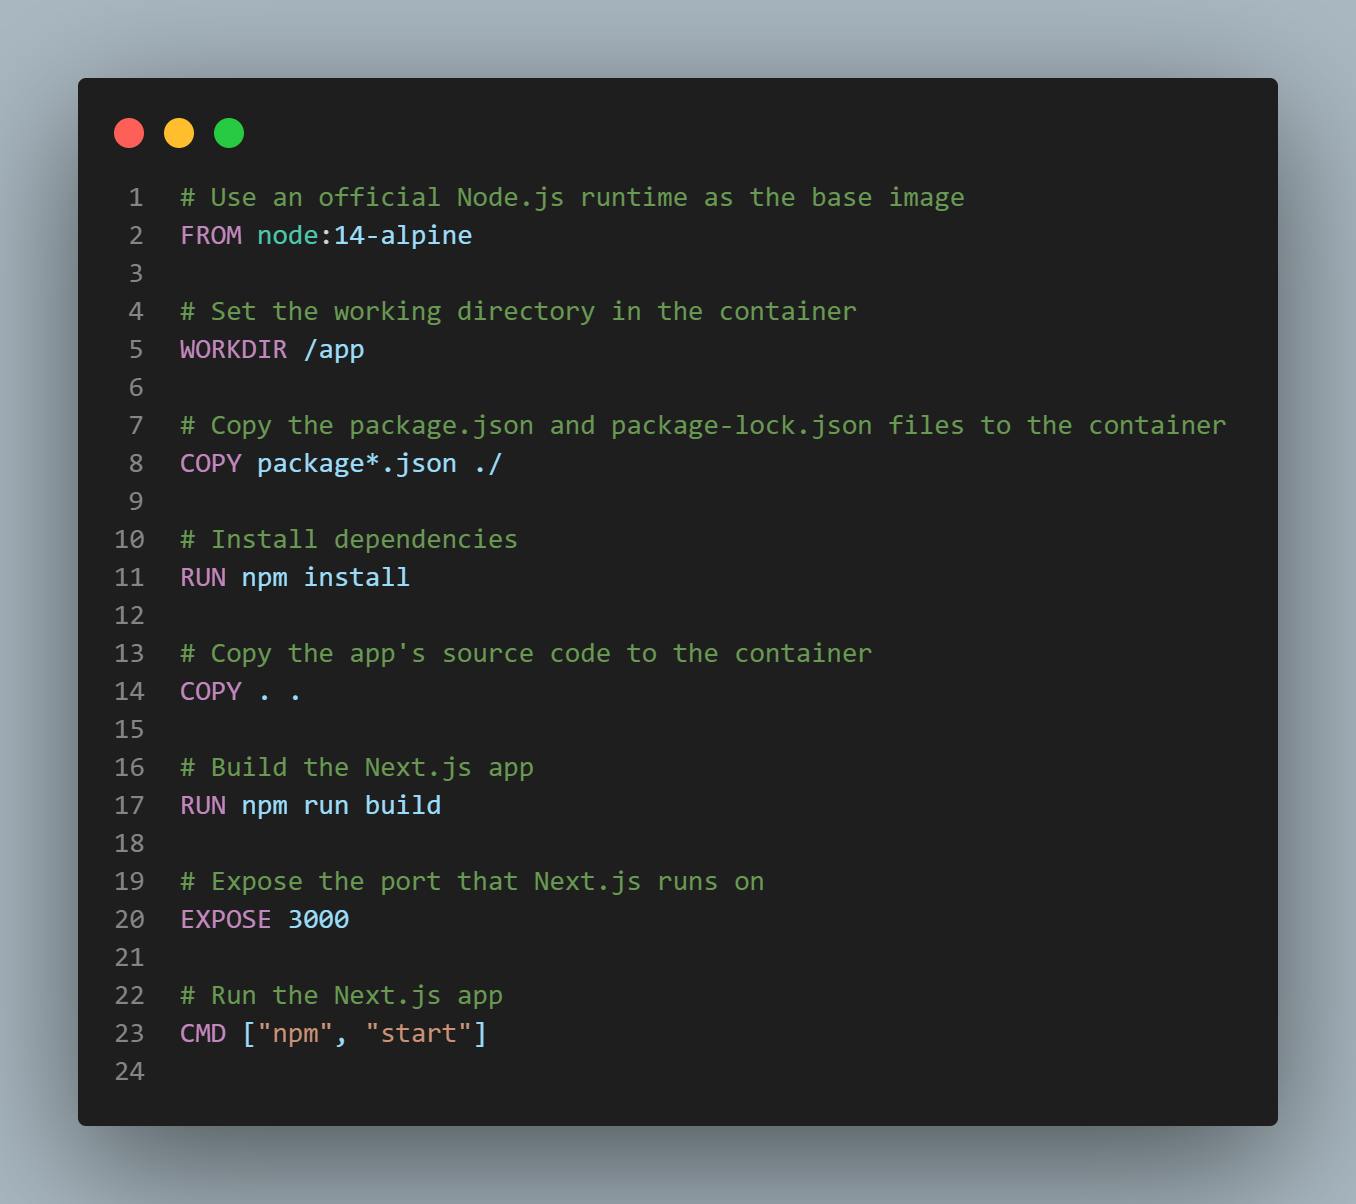
In the root directory of the Next.js project, create a Dockerfile. This file contains the settings for generating and running your Docker container. Here's an example of what your Dockerfile should look like:
# Use an official Node.js runtime as the base image
FROM node:14-alpine

# Set the working directory in the container
WORKDIR /app

# Copy the package.json and package-lock.json files to the container
COPY package*.json ./

# Install dependencies
RUN npm install

# Copy the app's source code to the container
COPY . .

# Build the Next.js app
RUN npm run build

# Expose the port that Next.js runs on
EXPOSE 3000

# Run the Next.js app
CMD ["npm", "start"]
Step 3️⃣: Set Default Platform for Docker Build
If you build the Docker image on an Apple Silicon device (or any ARM64-based architecture), you may find problems while deploying to an AMD64-based Linux or Windows environment. To avoid this, use the following command in your terminal to set the default platform for the Docker build:
export DOCKER_DEFAULT_PLATFORM=linux/amd64
Step 4️⃣: Build the Docker Image
To build the Docker image, follow these steps:
Save the Dockerfile in the root directory of your Next.js app.
Open a terminal and navigate to the root directory of your project (where the Dockerfile is located).
Run the following command to build the Docker image:
docker build -t nextapp .After the build process completes, you can run a container based on the image using the command:
docker run -p 3000:3000 nextapp
Step 5️⃣: Push the App to DockerHub
To push your Docker image to DockerHub, follow these steps:
Create a repository on Docker Hub with the name "nextapp" and set the visibility to public.
Login to Docker Hub using the command
docker login -u YOUR-USER-NAME.docker tag nextapp YOUR-USER-NAME/nextappNow retry your push command. You can omit the tagname component if you're copying the value from Docker Hub since you didn't add a tag to the image name. If you don't supply a tag, Docker will use the newest tag.
docker push YOUR-USER-NAME/nextapp
Step 6️⃣: Run on Spheron Compute
To deploy your app on Spheron Compute, follow these steps:
Click on New Cluster located in the top right corner of the Spheron Compute platform.
Select Import from Docker Hub to import your Docker image.
Enter the names for your cluster and Docker image as prompted by the platform.
Add the desired tag for your Docker image and click Next to proceed.
Choose the instance plan that best suits your needs from the available options and click Select Plan.
Create a new Port Mapping by specifying the container port and selecting the exposed port you want to map it to. For more detailed information, you can refer to the relevant documentation.
If required, add any necessary Environment Variables. If a value is a secret key, you can enable the Secret Key toggle to ensure it is not saved in the database. Further guidance on this can be found in the platform documentation.
Optionally, select your preferred Region for deployment. If no region is specified, the container will be deployed in any available region. Additional information on regions can be found in the documentation.
If needed, you can add advanced configurations for more specific requirements. The platform documentation provides further details on this topic.
Finally, click Deploy to initiate the deployment process.

🌌 Conclusion
Dockerizing your Next.js application directly from the VS Code platform on Spheron Compute provides a streamlined and efficient solution to application deployment and management. Developers can streamline their workflows, assure consistent deployment across diverse environments, and easily scale their applications to meet growing user demands by integrating the capabilities of Docker, Next.js, and Spheron Compute. You'll learn the information you need to utilise the full potential of containerization while working on your Next.js projects from the comfort of your VS Code platform thanks to my expertise and ideas offered in this blog article.